Thursday, November 24, 2011

Thursday Thoughts: Thanks


I am personally humbled and sincerely thankful for all of YOU each and every day!


A Safe
And
Happy
Thanksgiving
To you all!!

Wednesday, November 23, 2011

Winter Wear


If you read this blog regularly, you will note that I have a fascination with weather.  Part of that arises from cycling, which is at core and outdoor activity.  If one is going to be outdoors, it is good to have an idea of what to wear.  Wisely does the Sage say,  “There is no bad weather, only poor clothing choices.”  I hate making poor clothing choices, and I hate missing a ride.

Throughout the course of a year, I have many conversations with other riders.  Often, when the topic of rain comes up, I hear something like,  “I never ride in the rain.”  That baffles me a bit.   When pressed, most riders reply that they don’t want to have to mess with cleaning up the bike after a rain ride.

I could accept that, but I work on a lot of those bikes, and the folks who ride them just about don’t  bother to clean them up…  ever.  I’ve come to realize that most folks who “don’t ever ride in the rain,” have two real reasons for avoiding it.  The first is fear, and the second is lack of preparation.

The fear is fairly rational, but largely misplaced.  These riders are afraid that the bike will crash if ridden in the rain.  Honestly, with just a little common sense and caution, it won’t.  The lack of preparation comes from not paying more than cursory attention to weather forecasting, and from lack of knowledge about dressing for the weather.

Cold weather riding is a similar problem.  It’s about how to dress for it.

On that note, I’d like to address another aspect.  Each year, it is necessary to re-evaluate the weather gear.  If one is riding in our climate some cold weather and foul weather clothing are a must.  The good news is that these pieces last us a long time.  The bad news is, “a long time” does not  mean forever.  Sadly, cold weather gear does wear out.

Base layers should provide complete coverage, and while they are thin, they should have enough material to work as a wicking layer.  With repeated washings this kind of material wears and becomes thin.  When that happens, it becomes almost useless, and should be replaced.

Mid layers should be fleece or micro fleece.  This is the material that traps an insulating layer of warm air.  It should have “loft.”  With repeated wear and washing, that fleece compresses and compacts, and it flakes off in washing.

Windblocking outer layers are not immune to the wearout process either.

So, reasonably, we don’t want to have to spend more than necessary on protective clothing.  But we want to be reasonably warm and dry while riding.  How do we accomplish this?

Protect your investment:
Wash the stuff as soon as possible after wear.
Never subject technical athletic clothing to the dryer!  Let it hang to dry.
When the season ends, wash the stuff, and then store it, in airtight containers.
Older, less effective base and mid layer pieces still have utility on the less extreme weather days.

Constantly Build capability:
  • Budget for added weather gear each year. 
  • Each year, buy one or two pieces that compliment what you already have.
  • Evaluate your needs, and replace what is not working well.


Experiment, but control:
Don’t just trust claims on a new item.  Test it!  Example:  I always get into the shower with new rain gear.  I want to know how good it works before I depend on it.  In a similar fashion, go out for short rides with new cold weather gear.  You’d rather be close to home if it doesn’t work well, and you are starting to slip into hypothermia.

Learn a bit about the weather and climate:  It’s a fascinating subject.  And the ability to make reasonable guesses about conditions will allow you to ride more.  If you wait until ride time, and then look out the window, you’ll miss more rides.

Tuesday, November 22, 2011

The Repurposed Bike: Ready!

Gentlemen and ladies, here she is.  The "Repurposed Bike is now a new commuter, all fresh from the reworking and ready for the first ride.


Here she is in original form, a stock Giant Escape 1

And here she is now!  Readyand waiting  for that first trip.


Particulars:
Saddle:  An antique Brooks Professional
Driveline:  Shimano 8 speed
Shifters:  Shimano Ultegra 8 speed bar end
Brake Levers:  Cane Creek Drop V
Brakes:  Shimano Deore Vee Brakes
Pedals:  Shimano dual use (flats on one side, SPD on the other)
Cargo Rack:  Tubus
Fenders:  SKS
Frame:  Giant Escape
Wheels:  Giant
Handlebar:  Giant
Stem:  Giant
Tires:  Giant
Panniers:  Old School Schwinn  (Not this new, WalleyWorld crap, but real, honest-to-goodness Schwinn parts!)


The bar end shifters were chosen for their reliability, and because they were not integrated into the brakes.  That choice allowed the use of road bike “drop bar” type brake levers that would function with V-brakes.  Cool, huh?


This bike is a bit of an experiment.  It’s a re-blend of parts, to change the purpose of the bike.  This is no super lightweight racer, nor is it a heavy-duty tourist.  What it is (Hopefully) is a solid, reliable, dependable, commuter.  One that meets my particular needs.

Will it work?  How will it handle?  Will it do the intended job?  I’ll keep you posted.

Monday, November 21, 2011

The Beginning of the End:

Notes on the “Season,”  An Uncalled for Observation,  and Upcoming Events

We come to this week.  The week of Thanksgiving.  That, it has always seemed to me, is the point where the year starts to circle the drain.  It’s a confusing time.  The year is winding down, and we’re all running around like mad hatters, getting ready for it.  Still, we can not escape the fact that there are only six weeks left in this year.  And then comes the Winter.

For cyclists, and others active in the outdoors, this is an extremely challenging time.  The weather has turned a bit, and everyone we know seems to be intent on obligating us to go inside and eat.  (We all know where that leads.)

Good luck all.  Stay sane, and preserve your sense of humor.

An Uncalled for Observation:

Fact:  The majority of Triathletes are runners first.
Fact:  A triathlon consists of three distinct disciplines.  They are, in order, a mass open water swim race, a bicycle time trial, and a foot race.
Fact:  For those new to trisport, the greatest time gain possible is in the cycling segment.
Fact:  Triathletics is the fastest growing segment of the bicycle “market.”
Fact:  Triathletes (most of them, anyway) are not cyclists.  They tend to regard the bicycle as a vehicle that carries them from the water to the run.
Fact:  In a bicycle time trial, drafting is not allowed.  This is for safety.
Fact:  If folks stay in triathletics long enough, they will discover what road cyclists have always known; it’s easier to ride fast if you are drafting another rider.

Never mind that the last two facts are in direct logical conflict, they are real!  More and ever more, one sees “trikes” out on the road, engaged in “group training rides.”  When they are thus engaged, they will, most likely be attempting to paceline, and doing it poorly.

Recently, I had the following video called to my attention.  It speaks volumes to the point above.


Incidentally, the question does arise, why would one train for a "no draft" event by attempting to draft?


Looking forward:
I hope to have a good and happy announcement in tomorrow’s Tuesday Tome.  Please look for it.  (If you are not on the distribution list for this weekly newsletter, and would like to be, please contact me at the.road.dragon@gmail.com  )

Christmas Lights Rides:
There are two of these.  With one idea.  We’ll ride bikes, and look at some of the most extravagant Christmas Lighting Displays around.  Both start from Bicycles Unlimited.  In both cases, we’ll go at any temperature above 20 degrees F.  Rain will cancel.  No rain dates.  (Rain is defined as water falling from the sky, in any amount or form.)

Christmas Lights Road Ride:
When:  Monday 19 December, and starts at 7:00 P.M. (Sharp!)
Pace:  Recreational and moderate.  Group will stay together.
Distance:  About 25 miles.  (Expect to be out for two and a half hours.)
Required:  Dress for the weather.  Helmets.  Good lights on both front and back.  Reflective vest or sash and reflective ankle bands.  (There is no such thing as being too visible!)

Christmas Light Path Ride:
When:  Wednesday 21 December, and starts at 7:00 P,M. (Sharp!)
Pace:  Easy recreatonal.  Group will stay together.  No drop.
Distance:  Approx 15 miles.  (Expect to be out between an hour and a half and two hours)
Required:  Dress for the weather.  Good lights.  Helmets.

Annual Penance 100:
What can I say?  It’s an annual rite for some of us.  Get up early on New Year’s Day and go ride 100+ miles (with a mountain in the middle, yet), self supported.  It’s a way of saying,  “I’m still here!”  I recommend a moderate pace.  Seems like folks who try to hammer this one are the ones who tend to have trouble.  That’s not universally true, but it is a Winter ride, and most of us are no longer near our Summertime “peak.”  More, it’s a no SAG, no paint, no catered rest stop type of ride.  It’s fun, and it certainly establishes one’s “creds.”

I do recommend that you bring plenty of water and food, as well as other prudent preparations.  Usually there are some stores open along the way, but it’s not very reliable.
Start/Finish:  Bicycles Unlimited
When:  Sunday 1 January, at 7:00 A.M.  (Promptly, please!)
Distance: is 106 miles. (There’s a “Metric 100” as a “bailout.”)
Conditions:  Ride goes rain or shine, no rain dates.
Requirements:  You and your bicycles, helmets of course, a cheerful attitude, and your intestinal fortitude.
Note:  Cue Sheets are will be available at the start, and by email prior request.

So there you have it, a nice end to the year, and a great way to start the next one.

Friday, November 18, 2011

Friday Follies ~~ The System


Wisdom is the knowledge and foresight which prevents engaging in damaging, dangerous, or tricky activities.  Wisdom takes us out of trouble, and sees us through difficulties to a happy conclusion.

Where does wisdom come from?

In part, wisdom is innate.  It’s a character attribute, marked by the willingness to admit ignorance, and to accept learning.  Wisdom is informed by experience.

What is experience?

Experience is living through things.  Usually, experience means having survived a bad situation and learned from it.  The “bad situation” is usually caused by the lack of experience and wisdom.

Who designed this system!

A synopsis of the above, for technical matters, can be stated simply:  Experience is proportionate to equipment ruined.

Learning experience:
This refers to getting into a terrible situation, one that a little foresight and wisdom would prevent.

The Internet Experience Fallacy:
I have recently seen the results of folks attempting to do new things.  I’m usually in favor of this.  Be bold!  But be guided.  And know that the Internet is not a reliable source of wisdom.

I’ve recently seen three examples of folks trying to do things, guided by inexperience and internet tutorials.  The results weren’t pretty.

Example One:  The tire change.
The individual in question looked up a tutorial online.  The tire change was successful, but either the tutorial neglected to explain the need for tightening the skewers after the job was done, or the individual in question missed that step.  Fortunately, an observant mechanic was present when the do-it-yourselfer complained of a wobble.  It could have been a lot worse.  One bump and the front wheel would have dropped out of the fork.  Avoided, one bad crash, and major experience.

Example Two:  The new chain.
This intrepid individual thought to save about $15.00 by learning to install a chain from the internet.  After viewing the online the online tutorial, he purchased the chain from an online outlet.  (It was the wrong chain for that driveline.)  Then he bought a couple of tools from the same source.  Equipped with all this new found stuff, he replaced his chain.  The result?  A trashed rear derailler, a seriously damaged rear wheel, a broken chain.
Cost?
Chain $18
Chain tool $20
Chain holder tool $10
Rear derailler f$150
Rear wheel $200
Total:  $398 (plus tax)  Experience:  Priceless
Note:  This was to “save” the expense of having the shop install the correct chain ($30 for the chain and $15 for the labor)

Example Three:  The Home built wheel.
The internet made it look so easy!  And the cost of a new wheel is so high.  I can do it myself!  That was the reasoning.  So, after hours of struggling, this would-be wheel builder had something that actually looked like a wheel.  It collapsed on the first ride.  Fortunately the subject received relatively few injuries.  Nothing a trip to the ER and some judicious stitching wouldn’t fix.  Of course the wheel was a total loss, all parts damaged beyond recall, and the bike only needed a couple of hundred dollars or repair…  and a new front wheel.

Experience is the best teacher, but she’s a mean one!

Thursday, November 17, 2011

Thursday Thoughts: Blackout!


No, I’m not referring to anything involving alcohol!

I well remember the Summer of 1965 for many reasons.  I was in my mid-teens, and a lot was happening that year.  But one of the biggest events was the “Great Northeastern Blackout.”

It was amazing, and very scary.  The Cold War was going on.  The Cuban Missile Crisis was recent history.  Life seemed normal, if a bit nervous.  I was in my mid-teens.  We were watching TV, when the signal went out.  There were a few moments of static, and then the screen lit with a test pattern.  (In those days, there was no cable, and all TV was by broadcast.)  Eventually, our local station came back on the air with an announcement.  They had lost network feed from New York.  More, they were not able to contact anyone about it.  It was as if New York, and most of the northeastern part of the country had dropped off the face of the earth.

As the evening, and the next few days passed, we learned more.  There had been a massive power failure, and it had blacked out most of the north eastern United States and Canada.

I was no stranger to power outages.  Snow, storms, and the occasional wildly stray motorist had caused quiet a few in my life.  But this was different.  This was a power outage that affected a huge area, and cut power to millions.

Most folks in New York made a party out of that first big outage.  That attitude wouldn’t last.

Think about that for just a moment.  Traffic lights don’t work, so traffic goes to immediate gridlock.  Communications go out.  Emergency services depend on communications.  Heat, light, and air conditioning go away.  Trains stop running.  Airports can’t land aircraft.  Hospitals are suddenly dark.  Your friendly local policeman is likely stuck in traffic, and has no way to communicate with anyone.

In 1965 I lived in a rural town, outside of the area affected by the big blackout.

I was caught in one, not quite so massive, a bit later on.  I was in Richmond, VA when it happened.  I’d been down there for a bike race.  The power went out in the late afternoon.  For the whole city.  Battery powered radio news said that the area affected was huge, and no one new exactly when power would be restored.

By that time blackouts weren’t funny any more.  Usually there was a large amount of looting and lawlessness.

I had two reasons to get out of town.  One was fear of the situation.  The other was a job I needed to report to.  Home was about 120 miles and two mountain ranges away.  I packed up some food, grabbed some gear and my bike, and hit the road.

Getting out of town was a bit of a nightmare.  It was better for a cyclist.  The major thoroughfares in the city were blocked, but a bike is small, narrow, and maneuverable.  Three hours it took me to get well outside the city.  Another five hours saw me to the bus station in Charlottesville.  From there it was easy to buy a ticket and ride the rest of the way.  In the years since, I have used my bicycle as an emergency vehicle, an escape mode, a “second stage,” and a lifeboat on about 20 occasions.  A couple of those were genuine lifesavers.  It bears thinking about.

Wednesday, November 16, 2011

Projects: I gotta get this thing FINISHED!


I last wrote about the “Repurposed Bike” on 9/2/11.  To be honest, I haven’t done much on it since then.  It’s time to get it back into action.  (I have the distinct feeling I’m going to need a dedicated commuter this Winter.)  So here goes a bit more.

Fender Improvements:
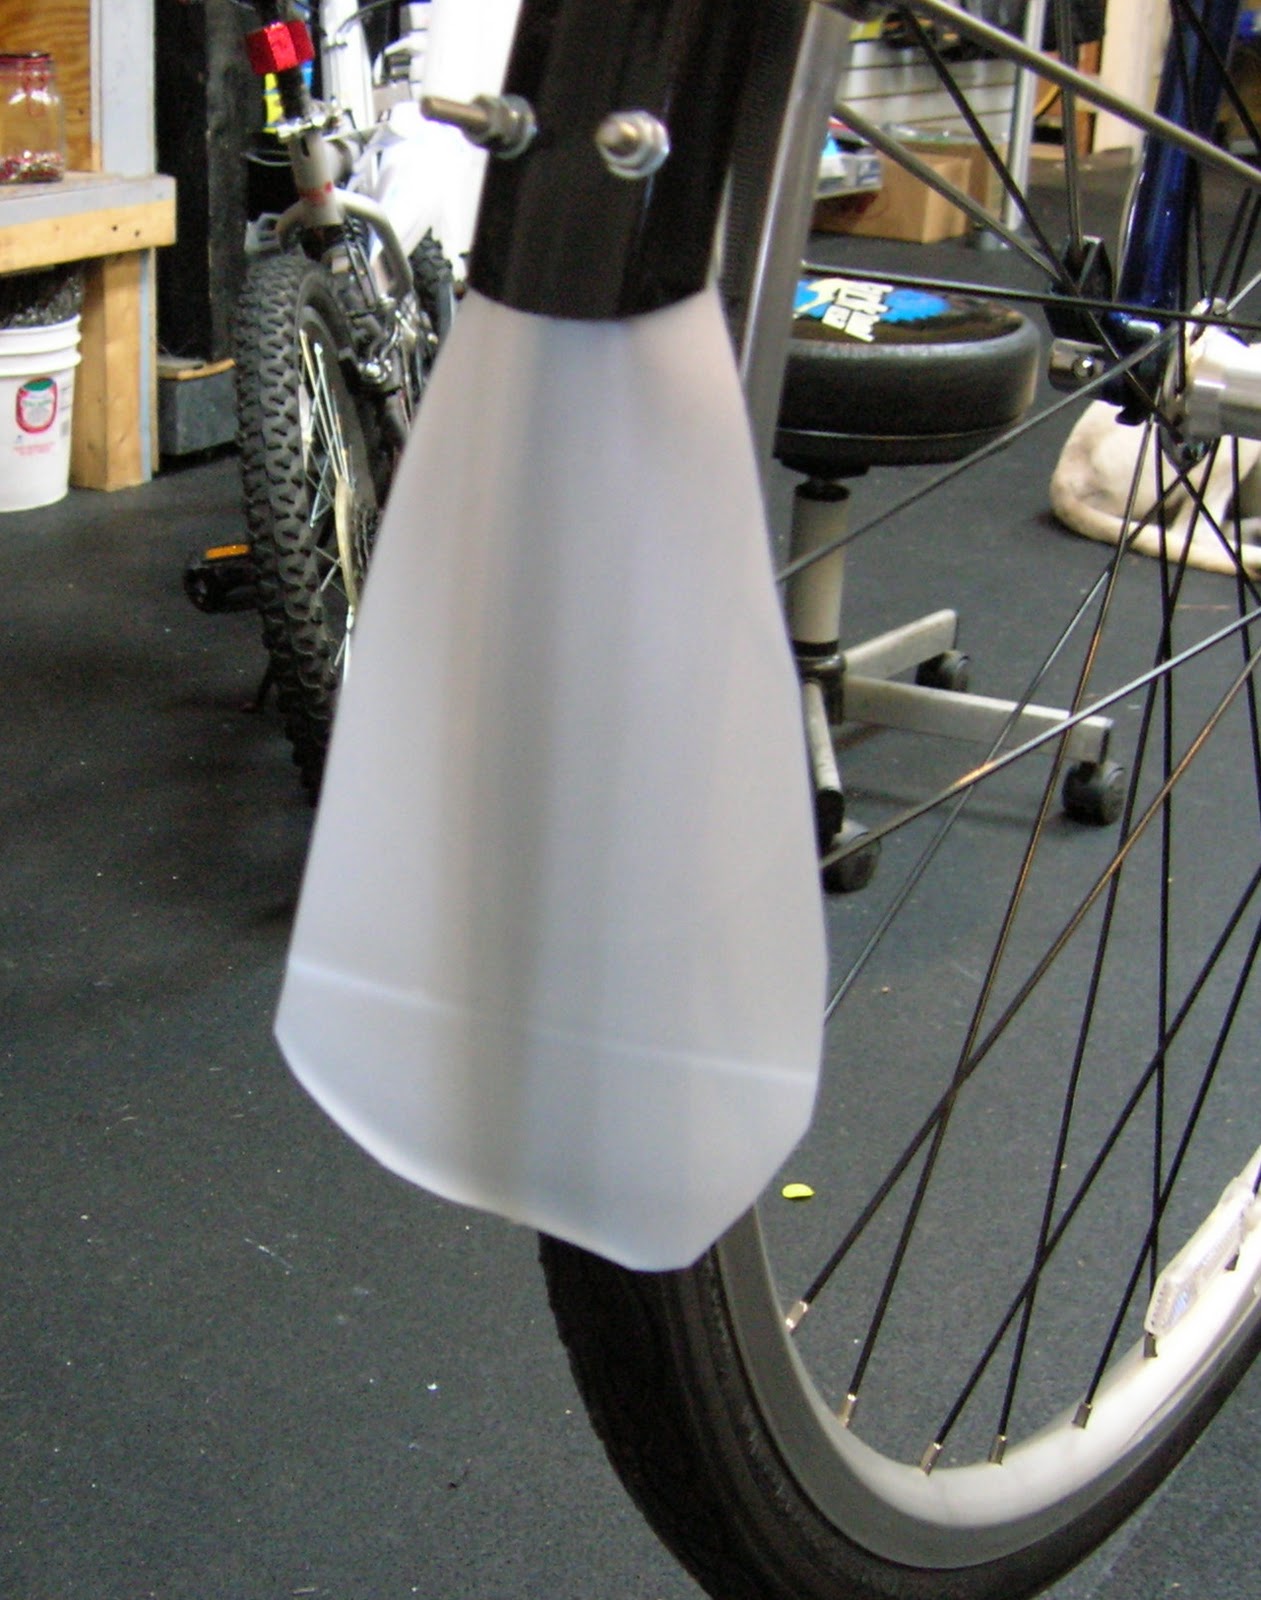
I’ve already mounted the fenders on this thing, and now I want to make them a bit better.  This is done by fashioning some extended mud flaps.  Adding a flexible flap to the bottom of the fender increases the coverage, and greatly decreases the amount of water and road gunk that is thrown onto the rider.  This project has another advantage.  It’s virtually free.

Start with a one gallon plastic milk jug.


I mark the jug with an indelible marking pen.


Then, using a good stout pair of shears, cut the jug along the lines.


This results in two sections.  These are the raw materials for the mud flaps.


The next step involves drilling the mounting holes in the fenders.  This is done with a drill and a small bit.  Usually the holes will be about an eighth inch in diameter, but make sure they are just big enough to clear the hardware.

What hardware?  Well, you’ll need four screws, eight nuts, and eight washers.  This is small change stuff, readily available at any Ace Hardware Store.

Two holes are drilled in the fender, about one inch above the rear bottom.  Be sure to make them far enough apart so that the flap is well supported.

Final shaping of the flap parts takes place.  Cut and form to the fender.  Removal of the remainder of the jug’s screw top, and the bottom triangular section happens here.  It’s possible to choose the best orientation for the size and shape of the target fender.  Some will take the “corner” quite well.  With others, it’s best to simply cut and shape the flap out of one of the flat sides.

Place a washer on the screw.   Insert the screw through the flap, and then the fender, from the inside.  Drop a second washer over the screw, then two nuts.  The first nut is tightened down, and the second serves as a locknut.

Here’s a finished view of the rear.  The rear is done in a similar fashion.


Note how much more coverage this provides.  It’s nice to have dry feet!