Showing posts with label Tech. Show all posts

Friday, August 8, 2014

Friday Follies ~~ Oops!


Yesterday, I was scrambling to get ready for the evening ride.  It had been a long, full, and complicated day.  I’d thrown the garage door open to grab the bike.  I had one of the cyclocomputers in my hand.  As I reached to bring the bike down from the hook, I fumbled, the computer left my hand and…  BLOP …right into the oil catch pan.  The full oil catch pan.  (I’d changed the oil on my truck earlier, and had not then disposed of the used oil.)

I have a complicated history with portable electronics.  I’ve dropped cell phones (unintentionally!) into the toilet.  I’ve drowned them other ways too.  I’ve run over PDAs with my truck.  Back in the Walkman era, I trashed several.  I thought my first flip-phone was really cool, until the bike crash.

Way back in history we didn’t have fancy electronics to train with.  Our concept was different (and largely wrong) then.  Basically we got on the bike and rode as fast as we could for a long time.  We knew approximately the length of various training rides because someone had measured them with a car’s odometer.  In those days bicycle speedometers where huge and clunky, and only seen on the bikes of kids and the occasional eccentric adult.

One day, shortly after the “pocket” calculator became affordable, electronic gadgets for bikes started showing up on the market.  (This was just about the time that DOS 3.0 rolled out.)  They were called “cyclocomputers.”  I resisted them for a time.

I bought my first bike computer.  It was an amazing gadget.  It was both a heart rate monitor and a bike computer.  The heart rate function told me how fast my heart was beating!  The thing also told me how far I ridden the bike, and how long I’d been doing it.  It had a stopwatch in it too.  It had one other interesting feature.  I could be switched between two wheel sizes, so if a second mount was purchased it could be used on two different bikes.  I bought the second mount and used the thing on both my road bike and mountain bike.

That early cyclocomputer had an unadvertised feature.  It was an incredibly sensitive detector of power lines and of the early high frequency wireless security systems.  When I got close to either of these things, my heart rate would go to zero.  Incidentally, that feature took a while to figure out.

I thought the thing was amazing!  I used it a lot.  It changed the way I rode and trained.  Then, on a trip to Tsali, I had it on my bike.  I hit a “wheel eater” while transitioning one of the stream crossings.  I watched the magic device pop out of its mount and then land in the water.  Before I could begin to recover, the little gadget floated right down the stream and rapidly down the waterfall.

For a long time, bicycle computers were somewhat problematical.  They worked okay, until they were subjected to rain.  Then they died.  For a time, I rode with my computer wrapped in baggies, or condoms.  It often helped preserve them.

Eventually, the manufacturers improved the seals on the gadgets.  I became a fan of Sigma brand equipment.  It didn’t die when exposed to a mild rain shower.  I became a real believer when I left my computer in a pocket and ran it through the wash.  That was a pair of work pants.  I wash my own clothes.  For work clothing, I use the heavy duty cycle on the washer, and the “don’t screw with me, get it dry dammit” cycle on the dryer.  The computer lived through all that.  Amazing!  I’ve been a convicted user of Sigma brand equipment ever since.

Yesterday, as I watched the computer disappear into the dark and nasty oil, I didn’t despair.  There wasn’t time for that.  Instead a acted quickly.  I snatched a nitrile glove out of the dispenser on the wall.  (Doesn’t everybody have a disposable glove dispenser in their home shoe?)  I slipped the glove on and reached down into the pan, found the device by feel and retrieved it.  Then a grabbed a handful of paper towels from the shop dispenser, and wrapped them around the hand with the glove.  That contained the mess so that I could dash inside.

A fast trip to the kitchen sink, and large dollop of dish detergent, and then under the stream of warm water.  Scrub with brush.  Presto!  The computer was no longer coated in used crankcase oil.  And it still worked!

It’s nice to know that we are making some progress.

Of course, I’m still carrying my phone around in a zip-lock baggie.  Phones don’t like to get wet.  Will their makers ever catch up with Sigma?


Wednesday, February 6, 2013

Tires, Tubes, and Inflation


(Reprinted here from the Monday Missive by popular request.)

Tires are wonderful things.  They are actually quite simple, and yet…

The majority of flats we fix at the shop can be traced to under-inflation.  I don’t think I’ll ever understand this.  

  • The range of inflation values is embossed on the side of every tire.
  • Tires lose air pressure.  They aren’t very thick.
  • If you don’t ride them often, they will go flat.  Pump them up before you ride.


The “roadie” mistakes:  Most “roadies” ride on under-inflated tires, unless they have recently over-inflated them.  Many road riders seem to be products of our society.  Like most Americans, they tend to think that if a little bit of something is good, then way too much must be almost enough.  Here’s the problem:  Under-inflated tires are flat-prone and make your bike slower.  Properly inflated tires roll more smoothly and don’t get as many flats.  For that reason, many roadies will run tires at the maximum inflation rating.  This is a bad idea, and it’s counter-productive.  An over-inflated tire is harsher.  It doesn’t roll smoothly over imperfections in the road, but rather bounces and vibrates.  Bounce and vibration are lost energy.  In other words they are slower.  Add to that, there is a risk of the tire exploding, or worse, of the over-pressure tire causing a failure of the wheel rim.
  • Always stay at least five pounds less than the maximum value on the tire.
  • There is an ideal inflation pressure for each tire width, and rider weight.  For most riders a 700 X 23 tire can be run safely and efficiently at pressures between 100 and 105 psi.


Common scenarios: 
1)  We have recently repaired a tire for a customer.  (Recently here is defined as less than a week.)  The customer comes back in with the same tire flat.
  • If the customer is angry, in almost every case, we will find a puncture.
  • Sometimes the recurring flat is our fault.  If it is, we fix it for free.
  • Occasionally (rarely) there is some underlying cause for recurring flats.  This could be a sharp drilling at one of the spokes, a failing rim strip, a sharp piece of something embedded in the tire.

2)  “My tire keeps going flat!”  We ask,  “When did you last inflate it?”  If the answer is, “I don’t know, just recently.”  Then the tire has not been touched with a pump in the last three months.

3)  “I took this out of the shed and pumped it up.  I haven’t ridden it in a while.  Do you think the tires are okay?”  The tires in question are crumbly with dry rot.  The answer is an emphatic NO!!

4)  “I haven’t ridden the bike in over a year.  You guys did a lot of work on it, but things just happened and I didn’t get a chance to ride.  So when I went out to ride the bike the tires were flat, and I pumped them up, but they expolded!

Here’s what happened.  The bike was sitting on the tires.  The tires lost air.  (See above)  The bike settled on the tire, and the tire was forced “off the bead.”  So the tire was not well seated on the bead, and then the bike was rolled to the compressor.  (This made matters worse.)  The compressor started inflating the tire, and the owener didn’t notice the huge bulge of unsupported tube.  BANG!

Find out what pressure is right for your bike, and riding needs.  Check, or inflate, every time you ride the bike.  Be careful.

Wednesday, March 28, 2012

Bike Care!


A word or two on getting the season going.

“What do I need to do to take care of my bike?”  In the bike shop I’m often asked that

“There is a lot you can do, and learn to do, but there are some very basic things that will help your bike to run well, and do so for a long time.  They are:
“Keep your tires properly inflated.
“Keep your bike lubricated.
“Keep your bike clean.
“Store your bike away from the elements.”

Here’s a fast refresher on the fundamentals of home bike maintenance:

Tires:  The inflation range is embossed on the sidewalls of your tires.  Check the inflation before every ride.  Put it in the correct range.  Stay at least 5 to 10 psi below the manufacturer’s maximum recommended inflation value.  (Overinflated tires wear faster, and can fail in drastic fashions.)

Lubrication:  Go and purchase the following:  A good, high quality, semi-dry chain lubricant.  A general, light penetrating lubricant, (NOT  WD-40!!!!!!) such as Boeshield T-9™.  For the chain lube I recommend Rock ‘N Roll.  It comes in three weights for differing conditions and riding styles.

Get some instruction on how to lubricate your chain.  (Rock ‘N Roll, if used correctly will help keep your chain clean as well as lubricated.)

Use the light lubricant (T-9) sparingly, to lubricate derailler and brake pivots.

Cleaning/Washing your bike:
Keep it clean and it’s not hard to clean it.  We see a lot of cases of “Rode hard and put up wet,” at the shop.  Usually these bikes don’t have a lot of wear on them, but the deterioration from corrosion and dirt penetration into mechanical parts is pretty rough.

A fast wipe-down, clean up, and re-lubrication (if necessary), if done immediately after riding, will serve you and your bike well.
(Note to mountain bikers:  A bike encrusted with mud is only a badge of honor for one hour after the ride.  Let the mud stay on it longer than that and you are just neglecting your bike.)

Quick notes on cleaning:
Road Bikes:  A fast wipe down with Simple Green ™ immediately after a ride is a good start.  Wipe wheels and tires down with a clean rag and rubbing alcohol.  A final wide with an oily rag to areas that are subjected to sweat and corrosives is a good idea.  Lube the chain (if necessary) and you are done.
Note:  If you went out in the rain, or got the bike really dirty, see the section below for mountain bikes.

Mountain bikes:  As already stated, sooner is better than later.  Mud is best removed while it is still wet.  However it’s not always possible to clean the bike at the trail head.  If it dries out on the way home, do the following:
Brush the worst of the accumulated mud off.  (Don’t wipe with a rag, that will only scratch your finish.)
Do not turn a hose on your bike.  Never not ever! Hosing the bike down will force muddy water into bearings.  (Remember, there is no such thing as a “sealed” bearing.)
Use a “Two Bucket System.”  One bucket with soapy water, one with rinse water.  Use a rag or sponge to carry water to your bike.  Brush first, then wipe with soapy rag.  Once the bike is clean and soapy, use new, clean rags or sponges and the rinse bucket to carry rinse water to the bike.
Bounce the bike on it’s tires several times to shake the most water off.
Hand dry the bike with clean, lint free shop towels.
Re-lubricate chain and pivots.

Set a Regular Maintenance Schedule:
Most of the things we’ve mentioned should be done on a regular basis.  Some actions should be taken every time the bike is ridden, others need to be performed on a routine basis.  It’s Spring now.  Yes, it’s early, and glorious, and it’s good to be outside and on the bike again.  But as the euphoria level drops a bit, it’s time to re-establish good habits.

Take care of your bike, and it will take care of you.

Tuesday, February 7, 2012

New Toys


I confess.  I’ve been playing a bit.  (When a mechanic is “playing” it usually involves machinery and grease.)

I’ve re-built my Giant Defy 1, with a brand spanking new component group.  It is now freshly outfitted with a SRAM Apex set, in what they call the WiFli™ configuration.

Apex is SRAM’s latest road group.  It is their entry level group, but it borrows technology from the high-end groups.

WiFli™ is a gearing and derailler configuration designed to give the rider the widest possible range of gear choices.

I chose to set the bike up with a “compact double” on the front.  That’s a double chainring crank with a 50 tooth big ring, and a 34 tooth small ring.  In the back I mounted their 11-36 cassette.  This is a very interesting set up.  The lowest gear is lower than any conventional “road triple.”  In fact it’s down in mountain bike low gear range.  And at the high ratio end of things, the combination of a 50T chainring and an 11T rear sprocket delivers a higher gear than said “road double.”  (Typical for “conventional” doubles, would be a 53 by 12)

Interestingly, the whole package; brakes, deraillers, chain, cassette, cranks, bottom bracket, and shifters; weighs less than the Shimano 105 group it replaced.

What it means:  I now have a bike that is a bit lighter.  I also have access to really low gears to save my old knees, and things that are higher than I would ordinarily need.  Wow!  Back when 9-speed drivelines were king, I used to accomplish this sort of thing by mixing and matching Shimano groups.  I could intermingle parts from their road bike lines with other compatible parts from their mountain bike line.  That let me build up drive trains that had very wide ratios.

It should be noted that Shimano discouraged the practice of group mixing.  According to the tech literature Shimano had published at that time, these groups were not compatible.  Maybe not, but every critical measurement matched, and the result worked pretty well.  Shimano have always seemed to have a strong bias against providing those wide ratio systems for road bikes.  They were slow to adopt road triples, slow to adopt compact doubles, and actively discouraged intermingling mountain and road parts.  (I used to wonder if the Japanese had some secret agenda.  Perhaps it was a plot to wreck the knees of all mature American riders?)
So here comes SRAM, with the same kind of thinking.  More, there is a huge amount of “cross-compatibility” between their various groups.

Early Riding Impressions:
Shifting is brisk, especially on the rear upshift.  I find that the front shifter requires more authority than I like for the upshift.  (I’m still tinkering with this, and it may well improve.)  The gearing available is, in a word, amazing!  The driveline is most notable for its efficiency.  (Cool!)  And there is an unlooked for benefit; the brakes are great!  So far, I like this stuff.  It performs well above price-point and expectations.


Wednesday, February 1, 2012

Stuff I like: Wheels


Wheels fascinate me.  All wheels, but most especially bicycle wheels.

The wheel goes back so far in humanity’s past that we have no idea who “invented” or discovered it.  The first wheels were these massive things made out of rough-hewn wood.  They were basically big disks of lumber.  This wasn’t extremely efficient, but it did allow draft animals to pull much bigger loads than they could carry.

We had those early disk wheels for a long time.  Then several geniuses invented two brilliant refinements; tires and spokes.

The first tires where iron bands, heated so that they expanded, and then allowed to cool and clinch around the wooden disk.  These made the wheels last longer, and roll over stuff better.

The idea of spokes was true genius.  If most of the material in that original wooden disk is removed, simply by cutting away pie-wedge sections, the wheel is both lighter and stronger.  (The idea of a rim, with individual, round, lathe-turned spokes came later.)  Those original spoked wheels bore the load in a totally different fashion than our bicycle wheels do.  In this kind of wheel, each spoke carries the load in compression.  That is it holds the weight up as it rotates through the bottom of the wheel.  To do this, spokes had to be massive columns that could withstand the crushing weight of the vehicle.

There is another way!  Some unsung genius turned the whole idea of spoked wheels around.  The revelation was simple.  “Spokes can be used in tension.  In this arrangement the weight of the vehicle is applied to the hub of the wheel, but the hub hangs from the spokes above it.  The spoke is being pulled from below, not pushed from above.  The load is then distributed around the rim from the top down.  The other spokes, also tensioned, hold the rim in place so that it doesn’t collapse.

When spokes are “tension loaded” they can be much thinner and lighter, and the wheel is, pound for pound, terrifically stronger.  Early examples of this type of wheel were used on horse drawn racing carts.  The system has been used in automotive wheels, and is still in use on most motorcycle wheels.  It’s also, by far, the most common method of building a bicycle wheel.

Other refinements followed.  Replace the steel “tires” with rubber ones.  Then Dunlop figured that solid rubber was too rough, and started building pneumatic ones, the kind we have today.  Spoke lacing patterns help to do the job too.  Different kinds of lacing provide different strengths and weaknesses.  As a general rule, lighter is not necessarily stronger.  (There are exceptions to this, but they usually involve some pretty exotic engineering and materials.)

In short, we who ride bikes are the beneficiaries of centuries of wheel development.  Each wheel is a complex system of carefully match components, assembled with care and attention to detail.  Wheel building is a mixture of science, technology, and art.  But our wheels are a key ingredient in the “single most efficient transportation machine ever invented.”


Tuesday, January 17, 2012

Clipless Pedals


First, a brief history:
Back in the late 1800s the “safety” bicycle was first put on the market.  This is the first of the “modern” bicycles, with a diamond frame, pedals, and a chain drive.  Note it had pedals.

At first, pedals were just a platform on which the feet rested.  The rider pushed down on them to make the bike go.

At some early point in history, some genius figured out that if the ride could pull up as well as push down, more power and speed could be developed.  So, for racing and performance riding, the rider had an assistant tie his (he was almost always a male in those days) feet to the pedals.  This had some fairly obvious drawbacks.  The most obvious was that the assistant had to be around when the rider wanted to dismount.

Further brilliant engineering ensued.  New pedals were introduced with a strap.  The strap had a buckle.  This allowed the rider to tighten his/her own pedals, and to a limited degree, to get out of them without assistance.  Still, this was a somewhat clumsy arrangement.

That led to the introduction of the “Toe Clip.”  Originally, the toe clip was a spring steel cage that held the strap open.  The new arrangement greatly eased the act of getting into and out of the strap.  For a long long time, that was as good as it got.

Along about 1971, the Cinelli folks invented the first modern “clipless” pedal.  The Look company introduced the first commercially viable varient of this idea in 1984.  These pedals engaged a cleat on the sole of a riding shoe.  This was a very positive engagement, and allowed the rider to push down, pull back, pull up, and push forward.  In other words, to make power all the way around the pedal stroke.  Because these devices did their job without a “toe clip” they were called “clipless pedals.”

Just to make it a bit more confusing, riders and bicycle people all, almost universally refer to the act of engaging a clipless pedal as “clipping in” or “clipping out.”

Why should I want to use these things?
Clipless pedals were developed for racing, but we mere mortals can benefit greatly from their use.  Having the foot, firmly attached to the pedal increases efficiency.  More different muscle groups are used to achieve a smoother, more even application of power.  The benefit is immediate, and only gets better with training.  In addition, having the foot solidly connected to the bike increases the rider’s ability to control the bike.  The solid engagement of the cleat and pedal almost completely eliminate the chance of a foot slipping from the pedal during maneuvering.

The one thing that is most surprising to new users, clipless pedals are safer.  Of course, that statement presupposes that the user has taken the time to practice with them, and has built new habits.

The Downside:
Cost.  An entry level set of pedals will set you back anywhere from $60 to $85, and the shoes can be had for about that again.

 Clipless pedals require training.  The motions, both for engaging them, and for disengaging, are not habitual.  One has to learn the techniques, and then one must practice them.  The best plan is to practice and drill with them, repeatedly, for the first several months, and then constantly revisit that practice.  Such work is, at first, time consuming, but it is well worth the effort.  The goal is to be able to release from the pedals, with either foot, at any point in the crankstroke, at any time, without thinking about it.  That sounds daunting, but you can accomplish this.  Please consider…  Once upon a time tying your shoes was a major challenge.  Yes?  I’m willing to bet you haven’t thought about it in years.

Conclusion:  If you race, or wish to race, learning clipless pedals is a must.  If you are a recreational cyclist, and wish to ride longer, better, and more efficiently, this technology is a tremendous benefit.  The cost is not prohibitive.  There are risks in the initial learning curve, but the long-term gain is great.

Tuesday, January 10, 2012

Getting through the Winter: Self Sufficient & Proficient


Winter is THE TIME to work on becoming a better and more accomplished cyclist.  No one is as fast in the Winter.  Large group rides are more difficult to find.  Weather and darkness make it difficult for many to get in a lot of riding outside.  That can actually be a good thing.  Below are several suggestions for activities that will greatly improve one’s confidence and skill.  These are things that do not require a lot of time, and that should best be done on a more individual (or at least small group) basis.

Become more self-reliant:  Free yourself for the need to wait on others for ride opportunities.  Remove some of the fear associated with riding.  How?  Do a bit of learning.

I hear this in the shop a lot.  I’ll be in conversation with a rider (and not always a new one!) and will hear one of the following questions:  “What if I get a flat?  Or, “What if something goes wrong with my bike?  These are good questions!  If the rider does not know how to handle a flat, or how to prevent problems and fix the more common ones, then they become emergencies.  The good news is, it’s relatively easy to do a little “Winter-work” and learn to downgrade those problems from “emergency status” to “inconvenience.”

Flats:  The 4 Part Solution
  • First, run good rubber, and inflate it properly.  (Most flats are caused by under-inflation!)
  • Second, watch were you are going.
  • Third, always carry a spare tube, a patch kit, 3 tire levers, and a pump. (see note 1)
  • Fourth, Learn to fix a flat.  (see note 2)

NOTE 1:  For general riding, pumps are the answer.  Save the CO2 inflators for competition.  Pumps are multiple use devices.  With inflators, you onely get one chance.
NOTE 2:  There are lots of videos and articles the internet.  Or, you can come into the shop and ask.  You can make an appointment for some personal, “hands-on” training.

Mechanicals:  The 2 Part Solution
  • First, learn to maintain your own bike, or start having it done on a very regular basis.  The first approach costs less.  Good, regular maintenance prevents the overwhelming majority of on-road mechanical problems.  (see note 3)
  • Second, Learn to fix the most common of the on-road problems.  (see note 4)

NOTE 3:  Minimum maintenance involves keeping it clean and lubricated.  Any shop will explain the how-tos of this to you.  If you wish to learn to maintain your bike, and do it well, take a class.  We offer them at Bicycles Unlimited.
NOTE 4:  You can “kill two birds with one stone.”  Take our “Mechanics Class” at Bicycles Unlimited.  It’s only one evening, by appointment.  We’ll teach you how to maintain, adjust, clean, and do the most common minor repairs.

We’ll talk more about this kind of thing.  We have in mind spending a bit of time on skills and techniques too.  What are the issues that keep you from being independent and free on a bike?

Monday, January 9, 2012

Looking Forward


To start with, we have firm dates for the Audax Tune Up Rides, and for the actual Audax 200K.  These dates appear on the “Tour Calendar” to the left, but we’re listing them, with times, below.

45 Mile Tune Ups:
Tune Up 1 ~ Sunday 26 February @ 1:00 P.M.
Tune Up 2 ~ Sunday 11 March @ 1:00 P.M.

65 Mile Tune Ups:
Tune Up 3 ~ Sunday 1 April @ 11:00 A.M.
Tune Up 4 ~ Sunday 15 April l @ 11:00 A.M.

Audax 200K ~ Sunday 20 May @ 7:30 A.M.

All of the Audax related rides will start and finish at Bicycles Unlimited, in Peachtree City, GA.

There will be posts in the near future with more information on these rides, and with links to previous posts about them.

Dirt Road Riding:
In last Friday’s post, I indicated that I would start doing a bit of focused work on dirt road riding.  I envision three different dimensions to this endeavor; 1) Equipment.  2)  Cue Sheets indicating where good fun dirt road riding can be had.  3)  Group dirt road rides.

What follows is a bit of an overview of my take on equipment choices for unpaved road fun in this general area.

What Bike?
As I’ve often stated, a road bike should be capable of being ridden on any road.  That said, not all road bikes are created equal.  Most likely, a high end, super light, carbon wonderdreambike, with ultra electric, computerized parts made from pure vaporware and unobtanium is likely not the best choice for this kind of thing.  Even the elite pros use different equipment for the early Spring “Classics.”  Honest, the bikes ridden in Paris-Roubaix are not the same as the ones campaigned in “Le Tour.

Of course, a mountain bike would work well on any non-paved road surface.  But pure mountain bikes have a drawback.  At least they do, if one’s dirt road riding is going to be in north and central Georgia.

The problem is that, we do have a lot of wonderful unpaved thoroughfares, but they tend to be rather short.  It’s hardly worth the effort to load up a mountain bike, and drive to a dirt road that is only 2 to 5 miles long.  But if one is willing to ride some pavement in between dirt stretches, then a lot can be done.  Unfortunately, mountain bikes, wonderful as they are, are not suited for long over-road excursions.

Like almost all discussions of this type, there is no definitive answer.  Things that work excellently for one individual just don’t get it for others.  What follows is based on my own experience, on trial and error, on observation of others, and on a good deal of reading and research.

Probably some kind of “road bike.”  The drop bar bike’s multiple hand positions and basic geometry work well in this kind of environment.  That said, most likely the best choice is going to be something a bit more robust.  Cyclocross frames, or tourists seem to work well.  I’d pick something that has the clearance to mount fatter tires than a typical racing type machine.  The ability to mount fenders is not essential, but can be nice, particularly if the weather turns wet.

A more relaxed seating position is good.  Most will find a “race oriented” frame to be fairly uncomfortable.  Further, the position (aggressive, deep lean, and forward stretch fit of a race oriented bike) is usually not comfortable for jouncing and rattling along. 

Stability.  Longer chain stays, lower bottom brackets help here.

Comfort.  More relaxed seat tube angles and head tube angles tend allow for a more comfortable position.  In addition, consider either double wrapping the bars, or having them wrapped with a gel padding under the tape.  Frames that are more “compliant” are usually better choices.  (In my opinion, too much “stiffness” is not necessarily a good thing.)  We are speaking of a high vibration environment.  A bike that transmits every tiny jolt and buzz is not pleasant on long stretches of dirt and gravel.

Tires.  700C is good, but the width makes a big difference.  Any width tire can be ridden on dirt roads.  However, wider, higher volume skins will yield a more comfortable ride.  Sometimes one encounters sandy sections, or ones that are “surfaced” with a deeper layer of small stone gravel.  In these cases narrow tires do tend to sink in and make handling and forward progress more difficult.  I don’t like to ride our local unpaved roads on anything less than a 700 X 25, and much prefer a bit wider tire to those.  Bikes with something between 700 X 28 and 700 X 40 tires seem to be good compromises.  The wider tires can be inflated to much lower pressures and tend to roll comfortably and smoothly over a lot of uneven stuff.

One more word on tires.  Tires with supple sidewalls, and good aramid belts are a delight.  The belts decrease the chances of punctures, and the more supple construction results in a lot less rolling resistance.

I know there are several of you out there who regularly engage in this kind of thing.  How about you chime in on the discussion?  There are a fair number of folks who are interested.

Wednesday, January 4, 2012

Stuff I like: Gadgets


We are often asked what particular gadget we use for various applications.  So here’s a few of our favorites, along with reasoning and justifications.  This isn’t meant to be a product endorsement (although in some cases it is); rather these are things that I have found suitable and dependable for various purposes.  These are offered in the hopes that the information will be helpful, and also a bit thought provoking.

Today’s Topic:  The Dashboard

General:  I like computers.  I use them for navigation and for keeping track of time, distance, and rate.  I’m also a fan of good navigation equipment.  I like solid strong lights.  I am a firm believer in cuesheets, and like a good, weatherproof holder for them.  I sometimes need a bit more room for all this stuff, so on some bikes, I’ve arranged for extended mounting devices.

I tend to like “stand-alone” devices.  In general, I’ve found that when too many functions are combined in a gadget, it leads to several outcomes, all undesirable.
  • The thing costs more (sometimes substantially more than several other devices performing the same functions.
  • If one function fails, the entire device needs to be replaced to gain it back.
  • Reliability and performance seem to decrease in the high dollar, highly integrated, multi-function gadgets.
In short, I like navigation equipment that navigates (only!), heart rate monitors that only monitor heart rate, and cyclocomputers that only perform time, distance, rate functions.

CycloComputers:  Before going farther, I should state this.  I’m strongly in favor of wired computers.  I have found the wireless ones to be reliability headaches.  They cost more, require more batteries, have great huge ugly sensors that are difficult to mount, and seem to have a service life of a little more than a year.  (I have some wired computers that are ten years old, and are still working quite well.)

If there is a cadence function, and the bike is to be used in a trainer, I prefer a long-wire harness that allows speed/distance functions to be sensed from the rear wheel.

I’ve found that the Sigma computers work wonderfully.  The wired ones are accurate, and reliable.  Battery life tends to depend on how many functions the computer has, but seems to run for a year to two years.  For cadence, I prefer the Sigma BC 1609.  It’s a workhorse, and with the optional longwire harness satisfies all of my requirements.

Cateye makes a very tolerable cadence reporting computer in a wired version.  I’m speaking of the Strada Cadence model.  In the wired version the harness is designed to reach the rear of the bike for speed/distance functions.  I have only two complaints about this computer.  First, its display is small, and somewhat hard on older eyes.  Second, the calibration procedure is arcane and decidedly not user-friendly.

Hear Rate Monitors:  Again, I’m a fan of the Sigma units.  They work, and are reasonably priced.

Navigation (GPS) units:  I like Garmen for navigation.  I am decidedly not a fan of the cyclocomputer/heart-monitor/navigation gadgets they make.  Seems they are very spendy, and they tend to develop positively weird reliability problems, typically within days of the expiration of the warranty.  I prefer a solid “mapping” GPS unit with which to navigate.

A note on “GPS enabled” time-distance-rate devices.  They are not as accurate as basic wheel sensing cyclocomputers.  For technical reasons, they cannot be.  Any highly portable GPS device can be pretty good at telling you where you are, but no so much in telling you how fast you are going, or how far you’ve gone.

Dashboard extenders:
I sometimes carry nav-aids, multiple computers, a cue sheet holder, and lights all on the same bike.  (I don’t do this on every bike, but for touring/randonneurring type applications, yes I do!)  On a road bike, there simply isn’t enough room to put all this stuff on the handlebar.  One solution I’ve found to be quite solid, and quite reliable, is the Minoura “Space Bar.”  The thing clamps around the handlebar, and provides a sort of Tee-shaped auxiliary bar, with space for anywhere from one to three additional gadgets.  I have one of these on my primary ride, on my tourist, and on my Spin Class bike. (Think computer, HR monitor, stopwatch, and lesson sheet!)  These things are not expensive, and they get the job done.  Yes, they have a high “geek factor,” but as always, form follows function.

What’s your story?  Is there anything that you carry on the “dash” which has proved especially useful?  For that matter, what dashboard gadgets have given you the most trouble?

Wednesday, November 16, 2011

Projects: I gotta get this thing FINISHED!


I last wrote about the “Repurposed Bike” on 9/2/11.  To be honest, I haven’t done much on it since then.  It’s time to get it back into action.  (I have the distinct feeling I’m going to need a dedicated commuter this Winter.)  So here goes a bit more.

Fender Improvements:
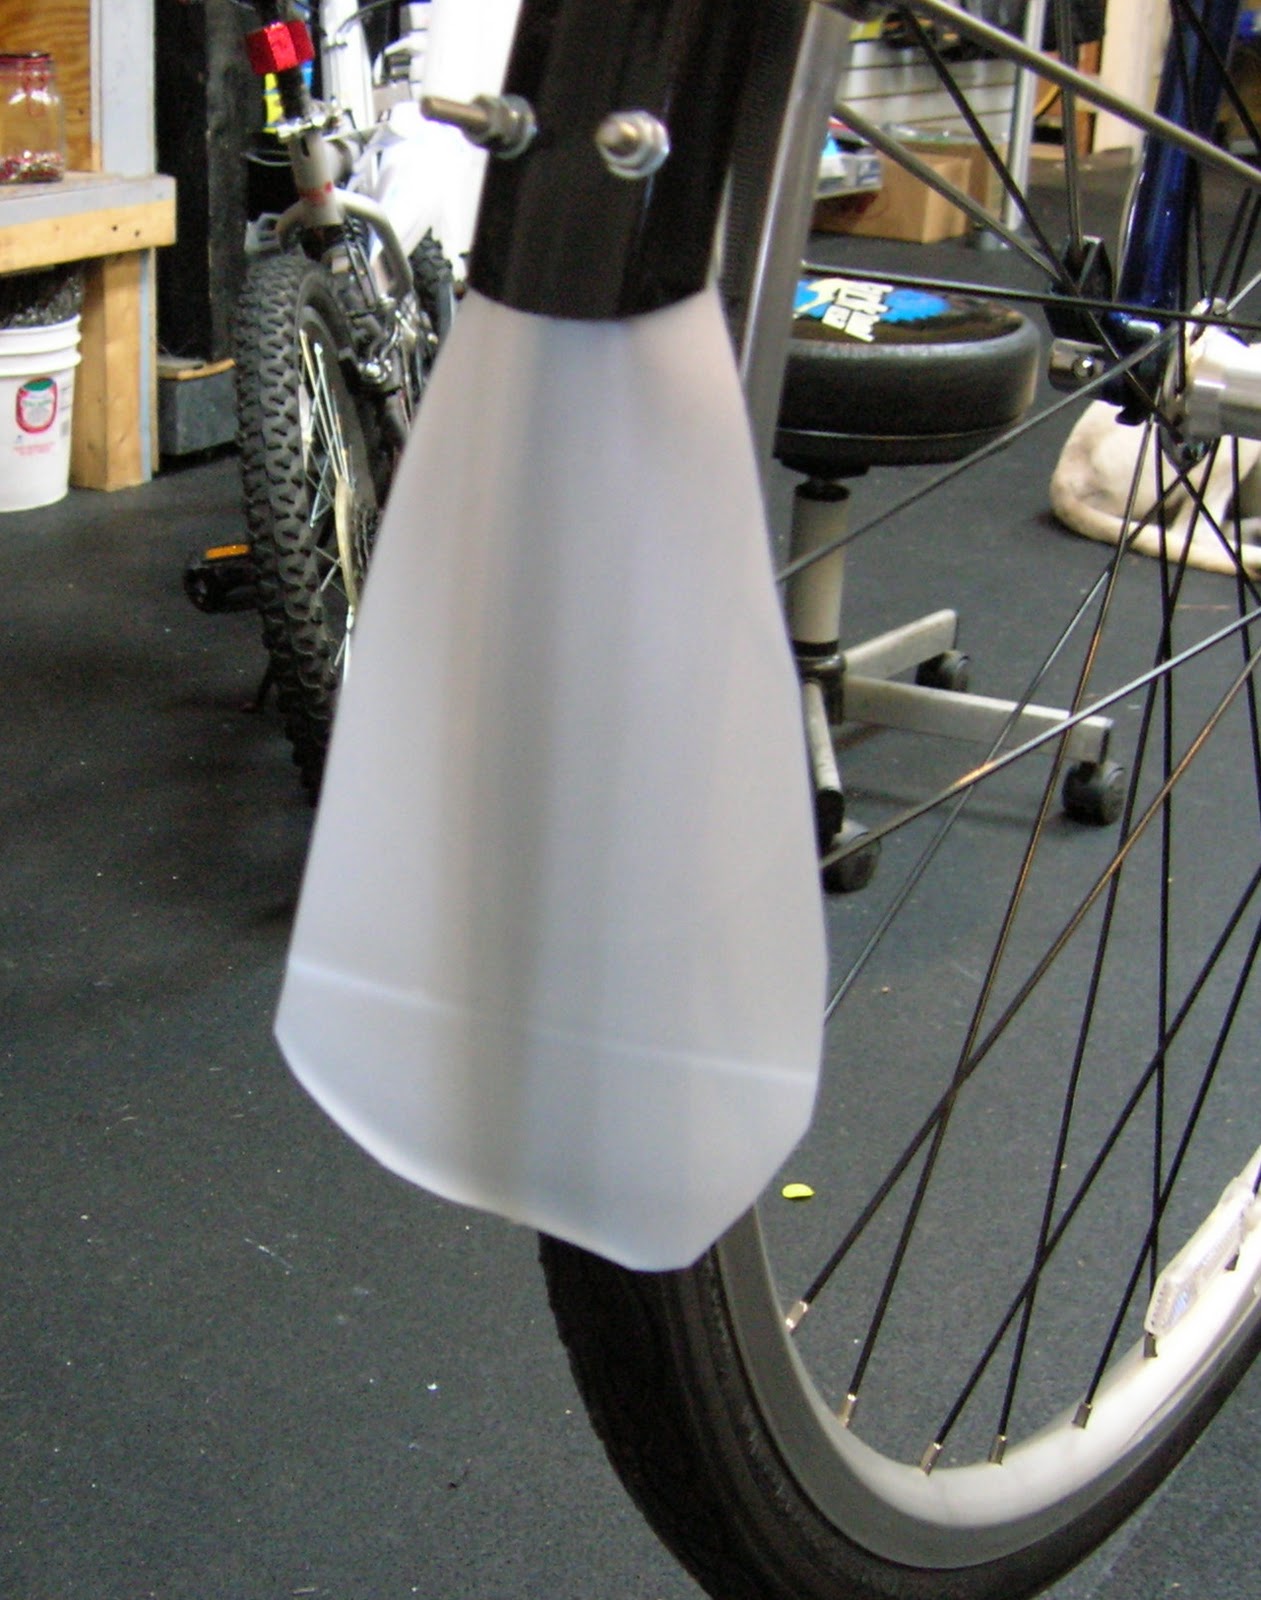
I’ve already mounted the fenders on this thing, and now I want to make them a bit better.  This is done by fashioning some extended mud flaps.  Adding a flexible flap to the bottom of the fender increases the coverage, and greatly decreases the amount of water and road gunk that is thrown onto the rider.  This project has another advantage.  It’s virtually free.

Start with a one gallon plastic milk jug.


I mark the jug with an indelible marking pen.


Then, using a good stout pair of shears, cut the jug along the lines.


This results in two sections.  These are the raw materials for the mud flaps.


The next step involves drilling the mounting holes in the fenders.  This is done with a drill and a small bit.  Usually the holes will be about an eighth inch in diameter, but make sure they are just big enough to clear the hardware.

What hardware?  Well, you’ll need four screws, eight nuts, and eight washers.  This is small change stuff, readily available at any Ace Hardware Store.

Two holes are drilled in the fender, about one inch above the rear bottom.  Be sure to make them far enough apart so that the flap is well supported.

Final shaping of the flap parts takes place.  Cut and form to the fender.  Removal of the remainder of the jug’s screw top, and the bottom triangular section happens here.  It’s possible to choose the best orientation for the size and shape of the target fender.  Some will take the “corner” quite well.  With others, it’s best to simply cut and shape the flap out of one of the flat sides.

Place a washer on the screw.   Insert the screw through the flap, and then the fender, from the inside.  Drop a second washer over the screw, then two nuts.  The first nut is tightened down, and the second serves as a locknut.

Here’s a finished view of the rear.  The rear is done in a similar fashion.


Note how much more coverage this provides.  It’s nice to have dry feet!

Friday, September 2, 2011

Friday Follies ~~ Progress (Of a sort)


One might ask,  “Why are you posting stuff about this buildup as a Friday Folly?  Wouldn’t it be more appropriate as a “tech” article?”

Those are good questions.  I guess, about now, the “Repurposed Bike” feels sort of folly-filled.  I embarked on it just ages ago.  My intent was to develop a commuting ride, and to have such ride ready to handle commuting in Summer rains.  (You might remember rain, if you go waaay back in your memory.  At the beginning of this Summer we had a good bit of it, and it looked like we’d have more.

You might refresh your memory by going to the post of 6/22/2011 (please note, this was just at the beginning of summer.

I already had the bike.  It is a Giant Escape 1.  (Actually it’s only a large bike, not all that giant really.)  Here’s a picture of it in the “before” condition.

The Escape in "Before" condition.


The reason it feels kind of like a folly, is that the project has taken so long.  The work needed would only take about an hour to an hour and a half of shop time.  But the thing is, much like the cobbler and his children, a bike mechanic does not have shop time to work on his own bike.  When the shop is open, customer work comes first.  And when there is a lot of customer work, it comes first when the shop is closed too.

But surely a mechanic of long service would have the resources to do some, or most, or even all of the work in a home shop?  Well yes.  But one has to be home to make use of those resources.  More, one has to be home and have the time available to the task.  While I do get home at least once in every day, I have lately had a few major project to occupy me.  I’m not complaining about that, mind you.  It’s just that this buildup has been on the front of my mind for a long time.

So here’s the current state.


A work in progress...


You’ll see that a lot of stuff is missing.  At the moment, this is not a rideable bike.  The Giant Sport tires are mounted, and look quite handsome on this rig.  Note that the fenders are (mostly) installed, and the Tubus rack looks very good on this frame.  The Cane Creek Drop-V levers have a businesslike presence on the bars, and the bars and stem seem to work well with this bike.  Bars and stem are not finally placed yet, but just that…  in place.  (Alert and astute readers will note that there is a bit of a difference in my usual backdrop.  That’s the result of one of those other projects I mentioned, and is in a stage nearing completion.)

Look for a couple of more posts on some of the detail construction.  These will appear in the near future, and they won’t be in the follies section.  Likely, mu “Summer” commuter will be ready in time for late Fall riding.  Or is that thought another Folly?